
 |
| Birdseye Flatfold Diapers |
You can make your own - NO sewing required!
You will need: Two padded training pants (you can also use underpants, but padded training pants will be more absorbent), one or two flat or prefolded diapers, four diaper pins and a waterproof outer cover.
Or use a waterproof covered training pant for your outside layer - for a two-in-one combo!
Using the cloth diaper, fold it into a long thick rectangular pad. Lay this inside one of the training pants, so the folded diaper pad lays down the center of the training pant.
 |
| Credit: Catherine McDiarmid-Watt All rights reserved |
Place another pin through the opposite short end of the diaper pad and back waist. Pin from the outside of the training pant, so as not to cause discomfort to your child.
Next, add the second training pant on the inside of the first, so you now have a training pant | folded diaper pad | training pant sandwich.
Add nylon, vinyl or other waterproof pull-on pants over top of everything. Or check into some of the newer fleece pull-on pants!
 |
| Dappi Nylon Diaper Pants |
baby-likenylon or vinyl pants. Your
bedwetter sandwichnow has four layers - training pant | folded diaper pad | training pant | waterproof cover.
Use the two remaining diaper pins to pin through the three layers - two training pants and one waterproof outer cover - this time placing one diaper pin at each side waist.
Push the pins through the same area as the stitching on the waterproof cover to prevent damage.
These pins help to hold everything all together, and will allow your child the independence to quickly pull up and down their Bedwetter Pants when they need to go to the toilet.
If your child needs even more absorbency, you can add another layer of folded diaper, but this could be very bulky.
These Bedwetter Pants can also be used during the day, for older children not quite ready, or not completely potty-trained.
 |
| Potty Training Pants |
Shopping Suggestions:
🚼 Gerber Birdseye Prefold Diapers🚼 Birdseye Flatfold Cloth Diapers
🚼 Dappi Waterproof Diaper Cover
🚼 Toddler Training Pants
🚼 OsoCozy Diaper Pins

Forget about those tiny mittens for winter babies.
Use your baby's older brother's or sister's woolly socks - clean, of course!
The socks will pull up high enough so baby can't get them off easily, and snow, etc. can't get in either.
Thanks to Arlene for this Frugal Baby Tip!
 |
| Sock Monkey Mittens |
Opt for mittens, not gloves. Itty-bitty fingers are also super susceptible when the temperature drops, so always make sure your baby or young child's hands are covered — preferably with mittens, which keep those dainty digits in close company so they can work together to stay warmer.
Read more: How to Protect Babies and Toddlers From Extreme Cold
 Shopping Suggestions:
• Organic Wool Toddler Socks
• Warm Wool Socks
• Easy-On Sherpa Lined Fleece Mittens
• Sock Monkey Mittens
I just use an old pillowcase for a laundry bag in the baby's room.
It is attached to the changing table by a cloth diaper pin.
It keeps all of my baby's dirty laundry and things together.
When it's time to wash, everything can be dumped right into the washing machine...
Including the pillowcase!
Thanks to Beth for this Frugal Baby Tip!
 Shopping Suggestions:
• GroVia Reusable Perfect Pail
• Charlie Banana Hanging Diaper Pail
• Planet Wise Hanging Wet/Dry Bag
• Ecoable Doorknob Diaper Pail
• Teamoy Travel Hanging Wet Dry Bag
• Bonng Baby Laundry Organizer

Make your own soakers
just like Grandma used to make!
Practical, economical and a pleasant alternative to plastic covers.
Wool soakers draw moisture away . . . help prevent diaper rashes . . . remain dry outside.
To make your own
baby bum sweater:
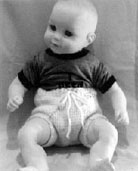
Cut equal-sided triangles from old, shrunk and matted 100% wool sweaters, and zigzag-stitch edges to prevent unraveling (optional).
You can usually get two small
baby bum sweatersfrom one adult sweater, or one large
baby bum sweater.
Check out your local Goodwill, second-hand stores or other thrift stores for second-hand wool sweaters to use - very cheap!
 |
| Photo credit: Catherine McDiarmid-Watt, on BorntoLove.com All rights reserved |
Premie.....cut three sides of triangle by 10 inches (26cm)
Newborn....cut three sides of triangle by 12 inches(31cm)
Medium.....cut three sides of triangle by 16 inches (41cm)
Toddler....cut three sides of triangle by 20 inches (51cm)
Super......cut three sides of triangle by 24 inches (61cm)
INSTRUCTIONS:
Cut along cutting lines for one baby bum sweater. Set aside the wrist-bands for use as leg bands on your baby bum sweater.
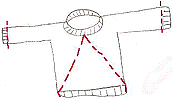 Picture one: (left) Cut along cutting lines (dashes in picture) for one
baby bum sweater. Set aside the wrist-bands for use as leg bands on your
baby bum sweater.
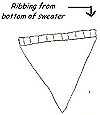
Picture two: (right) This is what your pattern should look like - using the sweater's waist band as the
baby bum sweaterwaist band.
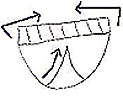 Picture three: (left) Fold up the material towards the waist band. Bring waist-band sides together at front.
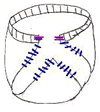 Picture four: (right) Sew along lines, about halfway along sides to form leg-holes. Be careful not to sew the leg-holes completely shut. You can adjust the leg hole openings, larger or smaller, to fit your baby's legs.
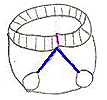 Picture five: (left) Your
bum sweatershould look something like this. Now take the wrist-bands you set aside earlier, and sew around the leg openings.
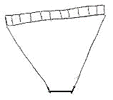 Picture six: (right) As an alternative, you can sew it like above, but trim off the tip of the top of the triangle. This will give you a wider waistband, when you attach it to all together.
To Finish: Crochet a long string of single crochet twice as long as the waistband. Thread through the
baby bum sweaterwaistband about every inch - poking the crochet string in and out - and tie in front.
Click for more free diaper patterns on BorntoLove.com
-- includes complete instructions to knit, crochet or stitch your own hand-made soakers! Plus lots of options, ideas and easy diapering hints . . .
Photo credit: Thanks to Angela for drawing the pictures!
All rights reserved
 |
| Reusable Diaper Cover |
More Frugal Diaper Covers and Soakers:
🚼 Frugal Diaper Sewing: Easy Homemade Soaker🚼 Frugal Diapering: Free Crochet Wool Soaker patterns
🚼 FREEBIE: Knit/Crochet/Sew Soaker patterns
🚼 Frugal Diaper Sewing: Free Diaper and Cover Patterns
🚼 Frugal Sewing: Make your own diaper cover pull-ons
🚼 Diaper Sewing: Making a fleece pull-on pant
🚼 Frugal Diapering: Make Your Own Baby Bum Sweaters
🚼 Diaper Sewing: More Free Wool Soaker Patterns
🚼 Diaper Sewing: 2 layer fleece soaker
🚼 Diaper Washing: Washing Wool Soakers
 SHOPPING SUGGESTIONS:
• ANACare Diaper Covers/Soakers
• Pea Patch Diaper Soaker Knitting Pattern
• Soaker Pantie Vintage Knitting Pattern
• Vintage Knitting Pattern
• Unisex adjustable Crochet Pattern
 Here are some quick and easy baby gift ideas:
If you can crochet, you can either buy flannel, burp cloths or ready-made receiving blankets, and finish the edge with crochet.
You can make a double layered receiving blanket just by sewing two together along the serged edge.
You can trim a receiving blanket with lace, ribbon, etc. for a beautiful finish!
More Receiving Blanket Ideas!
• How to Sew a Receiving Blanket
• Receiving Blanket with Matching Burp Cloth
• Reversible Flannel Receiving Blankets with Decorative Stitching
• Crocheted-Edge Blanket Tutorial
• 5 Crochet Edges You Should Know
And more baby gifts to make:
• Homemade Baby Gifts to Make
• Tutorial: DIY Lovey Tag Blanket
• Sew an Easy Beginner’s Baby Quilt
• 25 Fabulous Free Baby Sewing Patterns
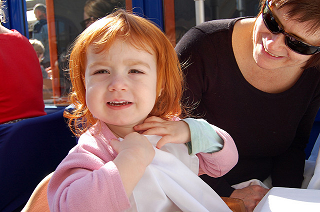
Need a bib and left yours at home? Or the one you brought is covered in food, and you need another one?
You'll just need to make and keep this in your purse or diaper bag!
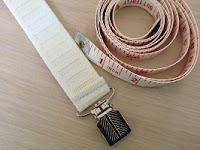
Take two
suspenderclips and about 10 inches (25cm) of fabric elastic to make a bib for your baby, instantly, wherever you are.
How to Make: Just fold each end of the elastic around the loop of one of the
suspenderclips and stitch.

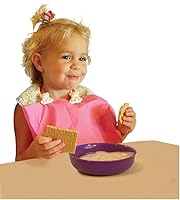
Now you can use this handy gadget to clip a washcloth (or two, for heavy droolers!) cloth diaper, or hand-towel around baby's neck
 Or store it in your purse or diaper bag for
on-the-go, and use it with the restaurant's cloth or paper napkins.
Other Uses: With a shorter piece of elastic and two more clips, you can make
mitten clips(attach one end to mitten, other end to sleeve).
Or even
shoe clipsfor those little ones who like to kick off their shoes! (Fasten one end at the back of a shoe, the other end to pant leg.)
Or fasten to snow pant cuff, wrapping under sock foot, to the opposite side of snow pant cuff - to keep snow pants from riding up!
Thanks to Linda for these Frugal Baby Tips!
Photo credit: Catherine McDiarmid-Watt
All rights reserved
 Shopping Suggestions:
• Baby Buddy Bib Clip
• Dritz Mitten/Suspender Clips
• Dritz 9517W Knit Elastic
• CTM Little Kittens Mitten / Gloves Clips for Little Hands
• 20 DIY Bib Snap Clips
• Adjustable Napkin Clip
• One Piece Mitten Clips
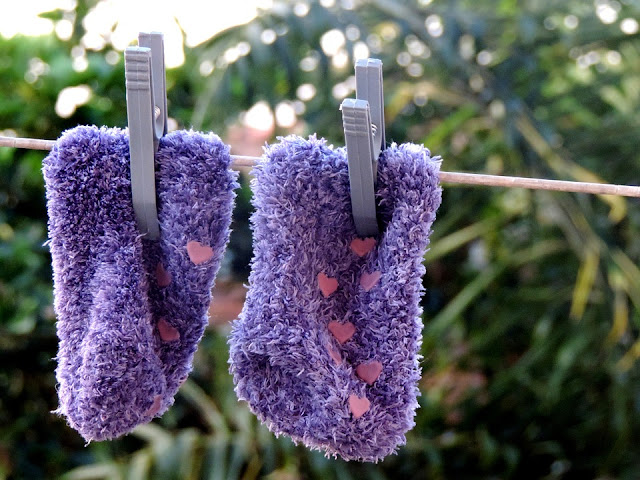
My baby is just starting to learn how to walk, and it is cold in the evenings (the reason for not being barefoot).
Instead of buying socks with grips on the soles already, we buy the socks in the bulk bag and use puffy paint on the soles.
If applied properly, this doesn't peel off (if you're worried about this, you can also get the non-toxic kind).
You can write anything you want, or draw pictures, and your baby has a better grip on the floor.
Thanks to Lisa for this Frugal Baby Tip!
 Shopping Suggestions:
• Tulip Puffy Paint
• Luvable Friends 10-Pc Baby Socks
• 3D Fabric Paint Set Kit
• Skidders Baby Gripper Socks
• Non Skid Baby Socks

Here is my Frugal Baby Tip - we always keep a small stack of bandanas in our backpack diaper bag.
We are learning what the cowboys learned, and more.
They are thin, lightweight, wash well, don't show stains, and are pretty much indestructible.
We use them for hats, scarves, diaper changing pads, bibs, light blankets, drool catchers, nursing shawls, washcloths, teethers, blindfolds, doll blankets and doll slings, and of course, for handkerchiefs.
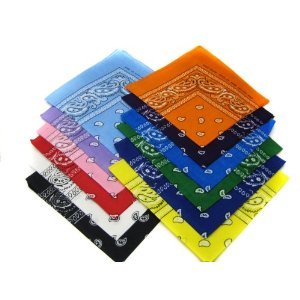
You can also read Cowboy Bandanas: Uses and Abuses about the bandana and where they came from and what they can do.
They rinse out well on the spot and, if you hang them on a stroller bar, they are dry again within an hour.
You can get them for about $10 a dozen, and if you shop online, you can get them in just about any imaginable color or pattern.
Thanks to Kim McKay for this Frugal Baby Tip!

To protect your crawling baby's tender knees, take a pair of adult's thick socks.
Cut off the foot part.
Fold up the raw edge of the ankle part.
Zig-zag stitch around.
Slip over your baby's legs to protect their knees from crawling.
 |
| Anti-slip Baby Kneepads |
Can be used over bare knees - or over baby's clothing.
Thanks to Catherine for this Frugal Baby Tip!
Would you rather buy them ready-made?
• Anti-slip Baby Kneepads
• Ashtonbee Baby Knee Pads
• Baby Knee Pads
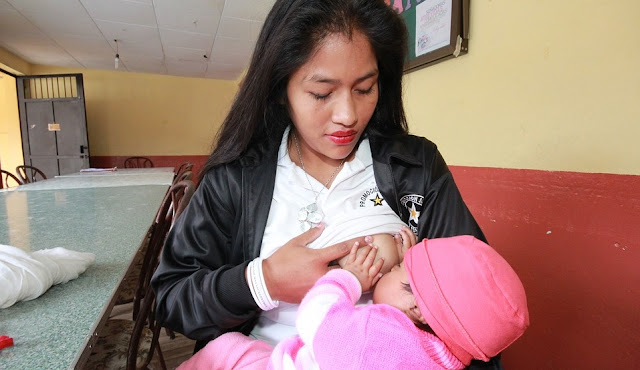
Three great craft ideas for nursing moms I came across today!
You can buy a nursing necklace already made from various places online.
You could find a suitable nursing necklace in a store.
 |
| Breastfeeding Support Bracelet |
However, making your own nursing necklace is fun and special because you can tailor it to your child.
It is also likely less expensive than buying a nursing necklace pre-made.
If you have more than one nursling, it is fun to have more than one nursing necklace.
How to Make a Nursing Bracelet
-- Nursing bracelets are a wonderful gift for the mother of a newborn. Not only are they stylish, but they are also functional. These bracelets are a helpful tool for a nursing mother to remember the time of the next feeding.
Nursing Bracelet Pattern
-- The following nursing bracelet pattern is made on memory wire to make it easy to transfer the bracelet from one wrist to the other (even while half asleep).
 |
| BusyTabs Breastfeeding Clips |
Or try this idea!!
DIY Nursing Reminders
-- Safety pins are a popular suggestion to remember which side you last fed on, but too easy to get pricked. You could also use a bobby pin or paperclip, easily lost, and you can see them through your shirt.
Or a bracelet you switch from arm to arm but ultimately you will forget. So try this ribbon reminder!
Thanks to Catherine for these Frugal Baby Tips!

Make your baby a really cute-looking romper from an older child's T-shirt or tank top.
Just make sure the hem of the shirt hangs a few inches lower than the baby's diaper crotch.
Stitch 2"-3" of Velcro® loop (or 2"-3" of snap tape
head) on the inside of the hem, centre-front, and 2"-3" of Velcro® hook (or 2"-3" of snap tape
holes) on the outside of the hem, center-back.
If you find the neck opening a bit too big, just overlap the fabric at the back of the neck, and add a dot or square of Velcro® or one snap to hold it closed.
The extra bonus is there is room in this romper to fit over a cloth diaper, AND the legs cover the diaper nicely.
Then you just slip your
newbaby romper onto your baby, and fasten at the crotch - how adorable!!
Thanks to Catherine for this Frugal Baby Tip!
ADDITIONAL RESOURCES:
• How to Make a Baby Romper from a T Shirt
If you need more detailed instructions, I found this tutorial with pictures - however it uses a bigger t-shirt, and requires more cutting and sewing

Shopping Suggestions:
• Velcro® Brand Soft and Flexible Sew-On Tape
• Velcro® Brand Sew On Squares
• DraperyDIY Snap Tape
• Dritz Sew On Snaps
• Lord and Hodge Snap Fastener Kit
 It's been a long time coming, but I have started updating the BorntoLove.com website. This past few days, I have been updating the Frugal Baby Tips section:
Here are all of our Frugal Baby Tips articles on Born to Love:
• Frugal Baby Tips Index
• Frugal Diapering
• Frugal Diaper Washing
• Frugal Diaper Rash and Baby Wipe Tips
• Make Your Own Baby Bum Sweaters!
• Let Sleeping Babies Lie - please...
• Frugal Safety Tips
• Frugal Toys and Playthings Tips
• Frugal Baby and Mom Clothing Tips
• Frugal On the Go! Travel Tips
• Frugal Miscellaneous Tips
• Make Your Own Rebozo Sling
• Stacking Tactile Toys and Healing Post-partum Stitches
• Mosquito Bites Relief and Frugal Cloth Menstrual Pads
• Absorbent Cheap Diapers and Protect Your Computer!
• Bedwetter Pants and Soothing Breast Pads
• Breathable Diaper Covers and Reusable Tampons
• Frugal Tips From My Readers!
Come check them out!
 Recommended Reading:
♦ Ecofrugal Baby: How To Save 70% Off Baby's First Year
♦ The Naturally Frugal Baby
♦ How to Save Hundreds of Dollars in Diaper Costs and Have Fun with Your Baby!
♦ Everything You Need To Know About Cloth Diapers
♦ Live Green and Frugal: Make Your Own Cloth Napkins, Wipes, Diapers, Rags and Other Household Items
♦ The Complete Tightwad Gazette
I use an old pillowcase for a laundry bag in the baby's room. It's attached to the changing table by a diaper pin. It keeps all of baby's dirty things together and when it's time to wash, everything can be dumped right into the washing machine, including the pillowcase!
Thanks to Beth for this Frugal Baby Tip!
Thanks to Beth for this Frugal Baby Tip!
Thanks to Lisa for this Frugal Baby Tip!
As my baby is just starting to learn how to walk and it is cold in the evenings (the reason for not being barefoot), instead of buying socks with grips on the soles already, we buy the socks in the bulk bag and use puffy paint on the soles.
If applied properly, this doesn't peel off (if you're worried about this, you can also get the non-toxic kind). You can write anything you want, or draw pictures, and baby has a better grip on the floor.
Popular Posts
-
 Period Panties Ready to give up disposable paper tampons, but not ready to give up their convenience and to switch to cloth pads? Fo...
-
 Would you like to prevent your toddler or pets from unrolling the entire roll of toilet paper, stuffing it into the toilet, or trailing...
-
 Sorry this giveaway has ended This is Frugal Freebies 3rd weekly giveaway and we are giving away Glade products. Other companies are we...
-
 Do you want to make wool soakers or diaper covers for a baby, but you are a crocheter, not a great knitter? I found a few patterns, and I a...
-
 Just wanted to share with someone who understands... Tonight I made Benjy the cutest wool soaker out of a shrunken wool sweater vest. ...
-
 Aching breasts? Need some relief? Cut out four 6 inch circles of a soft 100% cotton (prewashed) fabric, such as cotton knit, flannelette...
-
 I used Dr. Jack Newman's recipe for the homemade version of All Purpose Nipple Ointment , which one of the labor and delivery nurses g...
-
 Ingredients: 🧼 one bar Fels Naptha soap , grated (2-3oz bars or 1 4-5.5oz bar) (the finer grated the better) 🧼 one cup washing soda 🧼 ...
-
 Baby Stack and Nest Cups Baby Stacking Toys Save any empty plastic lids like shaving foam and hair spray lids. Wash well, and give to ...





Recent Comments