
Rebozo is a Mexican word for the shawl which is a woman's constant companion - day and night.
This shawl was commonly used to carry babies on mother's back. The fabric is simply tied in a knot, at the front, and placed around the mother's body.
An amazing tool, a Rebozo provides your baby with a safe and secure place while participating in life with mom and dad. So simple, yet so elegant!
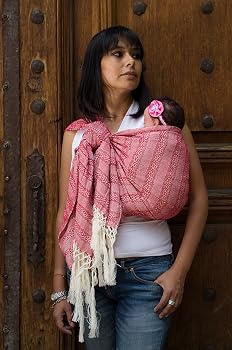 |
| Mexican Rebozo Carrier Hand made with ancient pedal loom technique in Tlaxcala, Mexico |
First, pick out a suitable fabric. Look for a gorgeous print you love, in resilient and breathable cotton, silk or wool. It should be strong enough to hold your baby's weight, yet still, allow air circulation for when your baby is all bundled up. If you aren't sure, place it over your mouth and try to breath through the fabric!
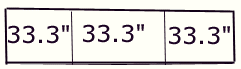 You will need 2 7/8 yards (100") or 2.54 meters (254 cm) of fabric at least 29" (73.7 cm) wide. Fold your fabric over lengthwise, then measure and mark your fabric into thirds along the length. You should have three equal sections of about 33.3" (84.6 cm) long each.

Next measure out the width at 14.5" (36.8 cm) in the middle third, and mark straight across the open side, parallel to the fold, with a pencil or piece of chalk.
On the other two thirds, measure 12" (30.4 cm) from the fold, and draw a tapered line from the middle third to the outer measurement at each end. You can do a straight line or a slightly curved line.
Pin the fabric together so it doesn't move about, and cut along your marked line. This leaves you with a 1/2" (12.7 cm) border for hemming. Fold in the raw edge 1/4" (6.4 cm), then again another 1/4" (6.4 cm) and stitch.
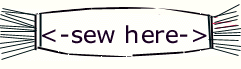
For an quick Rebozo trim, open up your fabric and simply add 10" (25.4 cm) of ready-made fringe at each end.
 For a Real Authentic Rebozo Look:
You will need 3 1/3 yards (1,207 inches) or 3.04 metres (304 cm) of fabric. Before marking your Rebozo in thirds, mark off 10 inches (25.4 cm) for the fringe, at each end. Now follow the instructions above, within these two lines.
Open up your fabric and sew two rows of stitching 1/4" (6.5 cm) apart, across the width at the 10" (25.4 cm) mark to reinforce it.
Pull out the weft threads, which are the ones which form the cross-wise grain of the fabric, up to the 10" (25.4 cm) mark.
Secure these newly released warp threads artistically, by tying, macrame, beading, etc.

 Mexican Rebozos are highly valued for the artistry going into this fringe. The expense and prestige of the Rebozo increases with the time put into the fringe. The best Rebozos have hearts, stars, ducks, donkeys and other geometric patterns knotted into the fringe.
Some have been embroidered with rural scenes flowers and animals, stories, religious experiences, to name a few. For those adventurous souls, you can even dye your own fabric, using natural dyes of green walnuts, indigo, iron, molasses, and cochineal.
It is said the beauty of a Mexican woman is to be judged
by her braids and her Rebozo.
For Best Results:
1. Buy extra fabric to compensate for shrinkage and the fact most fabric isn't cut straight. Cut it down to measure yourself.
2. Straighten the grain before sewing by pulling on diagonally opposite corners of the fabric.
3. Pre-shrink your fabric before cutting.
Acknowledgements: Parts of our article were taken from (1)
How to Sew Your Own Rebozo Sling© 1995, and (2)
History of the Rebozo, used with permission. The Rebozo Way Project is an educational project that teaches about traditional babywearing, in-arms and attachment parenting, and traditional ways of birthing and family and community relationships. You can learn more by visiting NurturingAcrossCultures
 Shopping Suggestions:
• Mexican Rebozo Carrier (Gray) - Hand made with ancient pedal loom technique in Tlaxcala, Mexico
• Mexican Rebozo Carrier (Purple) - Hand made with ancient pedal loom technique in Tlaxcala, Mexico
• Mexican Rebozo Carrier (Pink) - Hand made with ancient pedal loom technique in Tlaxcala, Mexico
• Mexican Rebozo Shawl
• What Can You Do With a Rebozo?
• The Easy Guide to Rebozo for Pregnancy and Birth

Since the beginning of time...
Babies have been cradled inside a sling, next to their mother's breast. Babies feel mother's constant warmth and protection, next to her heart.
The most natural way to carry your little one is snuggled close to your heart, in a cotton baby sling. Carry your baby in a large variety of positions, it is so simple to use.
Unique folds create a hammock effect to cradle newborn, nursing infant or sleeping child. Baby can lie down and sleep, or nurse in privacy with head and neck support.
This is a very simple, yet economical, sling carrier. No buckles, straps, extra padding or adjustments to make. The strap doesn't dig in, cushions entire shoulder for comfort. Weight distributed on your shoulder, hip and across your back helps to reduce back fatigue and lessen sway back.
 |
| Photo credit: Catherine McDiarmid-Watt of BorntoLove.com All rights reserved |
Fold sling in half length-wise once, and then again. You should end up with a sling roughly 10" x 26" (28")(30"). One long side will have a single fold, the other will have one fold and two finished edges. About one inch down from the seam, sew a 1" x 3" rectangle to hold the folds in place.
To use: Place sling over one shoulder and on opposite hip. Baby can ride on your hip inside two layers of the sling, or you can open up the seat part to cover the baby completely. If your sling is too loose at your baby's back, tighten fabric to hold the baby upright and use a diaper pin to mark. Remove sling and sew up a dart at the place marked with a diaper pin.
Thanks to Catherine for this Frugal Baby Tip!

Photo credit: Catherine McDiarmid-Watt of BorntoLove.com
All rights reserved
 Shopping Suggestions:
• Ring Mesh Baby Wrap
• Mila Adjustable Baby Sling
• Seven Everyday Slings
• Hip Baby Wrap Ring Sling
• BabyWombWorld Sling
• 4 in 1 Baby Wrap Carrier/Ring Sling

Turn your old jeans into a sturdy denim baby carrier!
You'll need TWO pair of adult jeans, with no worn spots on the backside.
Remove the back of the jeans from the fronts, leaving the thick side seams attached to the discarded fronts.
Cut off waist-band, belt loops and leg hems. Make a T-shaped cut up the centre from each crotch, as follows:
-- On one jean-back -
Tis through the centre of the back pockets.
-- On the other jean-back -
Tis midway between the crotch and bottom of back pockets.
 |
| How to Make a Baby Sling From Old Jeans |
-- Double-stitch along the length of both sides of these straps.
-- Place one jean-back on top of the other, to form an
Hshape - lining up one jean-back along the top of the other's pockets.
-- Double-stitch the two jean-backs together.
Tie the shorter straps around your waist.
For a front carrier, have a friend help place baby's stomach against your stomach, baby's legs on either side of the carrier seat.
For a back carrier, baby's stomach is against your back.
Bring carrier and longer straps up over baby, with one strap over each of your shoulders.
For a front carrier, you could cross the straps at your back.
While you hold securely onto the longer straps to support the baby, have your friend mark or pin where these longer straps meet the seat part, making sure this is a comfortable position for baby and you.
Remove the baby and carrier, double-stitch longer straps to marked spots, on the inside of the seat part.
Finish by folding and hemming any remaining cut edges.
Make sure all stitching seams are strong and sturdy for safety.
Thanks to Catherine for this Frugal Baby Tip!
ADDITIONAL INSTRUCTIONS WITH PICTURES:
• For more pictures and instructions, including a slideshow: How to Make a Baby Sling From Old Jeans, by E. A. Byrnes, May/June 1982, MOTHER EARTH NEWS
Popular Posts
-
 Period Panties Ready to give up disposable paper tampons, but not ready to give up their convenience and to switch to cloth pads? Fo...
-
 Sorry this giveaway has ended This is Frugal Freebies 3rd weekly giveaway and we are giving away Glade products. Other companies are we...
-
 Would you like to prevent your toddler or pets from unrolling the entire roll of toilet paper, stuffing it into the toilet, or trailing...
-
 Do you want to make wool soakers or diaper covers for a baby, but you are a crocheter, not a great knitter? I found a few patterns, and I a...
-
 Aching breasts? Need some relief? Cut out four 6 inch circles of a soft 100% cotton (prewashed) fabric, such as cotton knit, flannelette...
-
 Baby Stack and Nest Cups Baby Stacking Toys Save any empty plastic lids like shaving foam and hair spray lids. Wash well, and give to ...
-
 Just wanted to share with someone who understands... Tonight I made Benjy the cutest wool soaker out of a shrunken wool sweater vest. ...
-
 I used Dr. Jack Newman's recipe for the homemade version of All Purpose Nipple Ointment , which one of the labor and delivery nurses g...
-
 Do you have any old, shrunk and matted wool sweaters? Then you can make two excellent diaper covers per sweater. The more matted the swe...





Recent Comments